
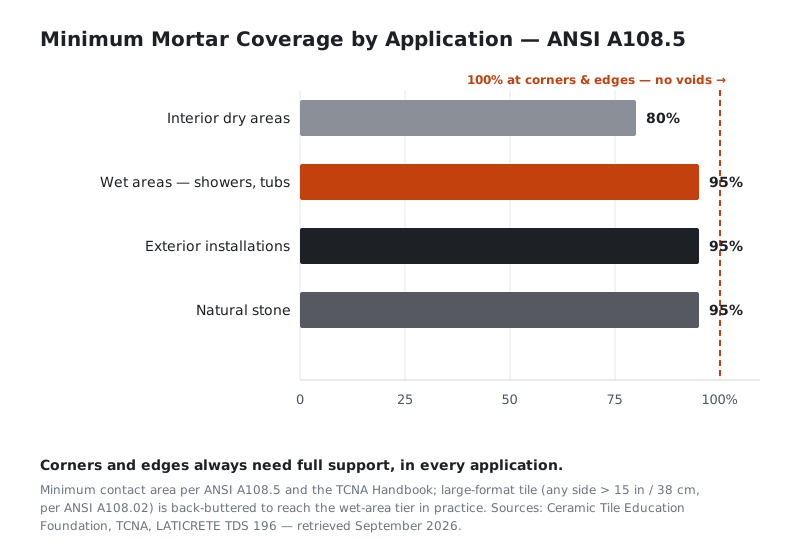
Bottom line: ANSI A108.5 asks for at least 80% mortar coverage between tile and substrate in interior dry areas, 95% in wet areas, on exteriors and under natural stone — and full support at corners and edges with no voids, everywhere. Everything below is what those two numbers mean once they leave the standard and land on a purchase order.
ANSI A108.5 Mortar Coverage Requirements in Plain Terms
ANSI A108.5 is the American National Standard for setting interior floor and wall tile with dry-set or latex-Portland cement mortar — the thin-set method behind most container loads of porcelain and ceramic tile sold in the US. The current edition of the A108/A118/A136 series is 2024. "Coverage" is defined after installation, not after mixing: beat the tile in, then measure how much of its back is in contact with mortar. The standard's inspectors' logic is blunt — a tile that reads 60% bonded has voids holding air and water, and no grout line will fix that.
Three parties lean on the same clause. Architects write the coverage minimum into specification sections. Installers prove it at the mockup stage by lifting a tile while the mortar is still workable. And when a floor fails, distributors and importers are the ones asked to produce the number — which is why it belongs in your paperwork, not just the installer's method statement.
80% vs 95%: Where Each Mortar Coverage Rule Applies
The two tiers sort by what a void costs:
- 80% — interior dry areas. Floors and walls in normal service: lobbies, living rooms, offices. The remaining 20% is allowed to be scattered voids between mortar ridges.
- 95% — wet areas. Showers, tub surrounds and any surface that gets water. A void is a water channel; over winters with freeze-thaw it becomes a spall.
- 95% — exterior installations. Same physics, plus thermal cycling. Voids collect water, water freezes, the face pops.
- 95% — natural stone. Voids under translucent or light-bodied stone show through as dark blotches, and stone tolerates less bending before it cracks.
- 100% — corners and edges, every application. The perimeter and corners of each tile need full support with no voids — this is the part of the clause most often missed, and it is exactly where tiles break first.
Back-Buttering and Large-Format Tile: When 80% Is Not Enough
Large-format is the industry's growth lane and its worst coverage risk — defined as any tile with one side over 15 in (38 cm) per ANSI A108.02 and the TCNA Handbook (in ISO terms, tiles of 1 m² and above). On a 24×48 slab, trowel ridges alone collapse unevenly under the tile's own weight, leaving air channels that never show from the surface. That is why the standard describes back-buttering — keying a uniform coat of mortar onto the tile back with the flat side of the trowel — in ANSI A108.5 §2.4, a clause manufacturer TDS documents such as LATICRETE TDS 196 cite directly. In practice, large-format and stone work is back-buttered to reach full-contact territory, with the flat side of the trowel first and a notched comb second to rib the coat.
For wholesale buyers the commercial translation is simple: the bigger the format your customers install, the closer the job drifts toward the 95% tier regardless of room type, and the more the spec should say so explicitly instead of trusting the crew to improvise.
How Low Coverage Turns Into Claims, Hollow Spots and Lippage
Under-specification coverage rarely fails at once — it fails in the four ways that generate claims: the floor rings hollow under a rolling case, a point load finds the edge of a void and cracks the face, water migrates through channels in a shower and reappears as staining, and unsupported edges settle while the rest of the tile does not, so a compliant floor still drifts past the ANSI lippage tolerance limits as the adhesive cures. That last mechanism is why coverage and leveling get specified together: tile leveling clips hold the joint at height while the mortar cures, but no clip compensates for a corner sitting over air — which is also the honest answer to buyers comparing rectified tile lippage problems across suppliers.
Field verification costs minutes: lift one tile from the mockup area while the bed is fresh, estimate the bonded share against the tile back, photograph it, and attach the photo to the handover file. Every dispute we have seen was decided by whether that photo existed. And underneath all three — coverage, leveling, lippage — sits the slab itself: the tier table in our tile substrate flatness requirements guide sets the plane the tile actually lands on.
Writing Mortar Coverage Into an RFQ or Wholesale Spec
Most RFQs we receive specify tile format, water absorption and carton counts — and say nothing about installation coverage, which is where the liability actually sits. One paragraph closes the gap:
Installation shall achieve minimum 80% mortar coverage per ANSI A108.5; 95% in wet areas, exterior applications and under natural stone; full contact at all corners and edges with no voids; tile with any side over 15 in (38 cm) to be back-buttered. Coverage to be verified at mockup by lift test and photo record.
Distributors we work with print that paragraph into the installer one-pager packed with the cartons, and it costs nothing per unit. If you are building a program around it — coverage wording, leveling hardware, container quantities — our tile leveling system wholesale supplier page lists the full range and MOQs, or send the spec and we will mark it up before it goes to your installer network.
What is the minimum mortar coverage under ANSI A108.5?
80% of the tile back in contact with mortar for interior dry areas, rising to 95% for wet areas (showers, tub surrounds), exterior installations and natural stone. Corners and edges require full support with no voids in every application.
Does ANSI A108.5 require back-buttering?
The standard describes back-buttering — keying mortar onto the tile back with the flat side of the trowel — in ANSI A108.5 §2.4. It becomes necessary in practice wherever a notched-trowel bed alone cannot reach the required contact level, which today means large-format tile (any side over 15 in / 38 cm) and natural stone in particular.
What happens if mortar coverage is below 80%?
The voids stay as air and water paths: the floor sounds hollow under rolling loads, point loads crack tile faces at void edges, showers develop water channels that resurface as staining, and unsupported edges settle into lippage while the adhesive cures. Below-80% coverage is the trigger condition in most post-installation claims, not a cosmetic issue.
How do you check mortar coverage in the field?
During the mockup — or periodically on large floors — lift one freshly set tile while the mortar is workable, estimate the bonded share of the tile back against its grid, and photograph the result for the handover file. The lift test takes minutes and is the evidence every coverage dispute turns on.
Send us your RFQ or installer one-pager — we mark up the coverage and leveling paragraphs before your next container ships.
Talk to Our Team →